How to Make a Website with Wix: Free Step-by-Step Guide
Disclosure: Some links in this guide are affiliate links. If you buy through them we may earn a commission, at no extra cost to you. We only link to tools we use in the guide. How we make money.
On this page
The short answer
- What you'll build
- A small business website made from a free Wix template, with your own text, a page menu and a free yourname.wixsite.com address.
- Time
- About 1 hour
- Cost
- Free on the Wix Free plan. Premium plans started at A$21 a month billed yearly (Light), including GST, on wix.com/plans on 17 October 2026.
What you'll need
- A Wix account Free. Sign up at wix.com with an email address or another account.
- Your text and photos Your business name, a headline, a few lines about what you do and how to reach you. The template's photos are fine to start with.
- Your own domain (optional) Connecting a domain such as a .com.au needs a Wix Premium plan. The free wixsite.com address costs nothing.
Wix is a drag-and-drop website builder with hosting included: you pick a template or let its AI write a first draft, then change anything you like in the editor. It’s a good fit for small business sites, portfolios and event pages, and you can start on the Free plan.
We worked through every step in a real Wix account on the Free plan, building a made-up cafe from a free template, and took every screenshot from it.
Step by step
-
Step 1: Create a new site
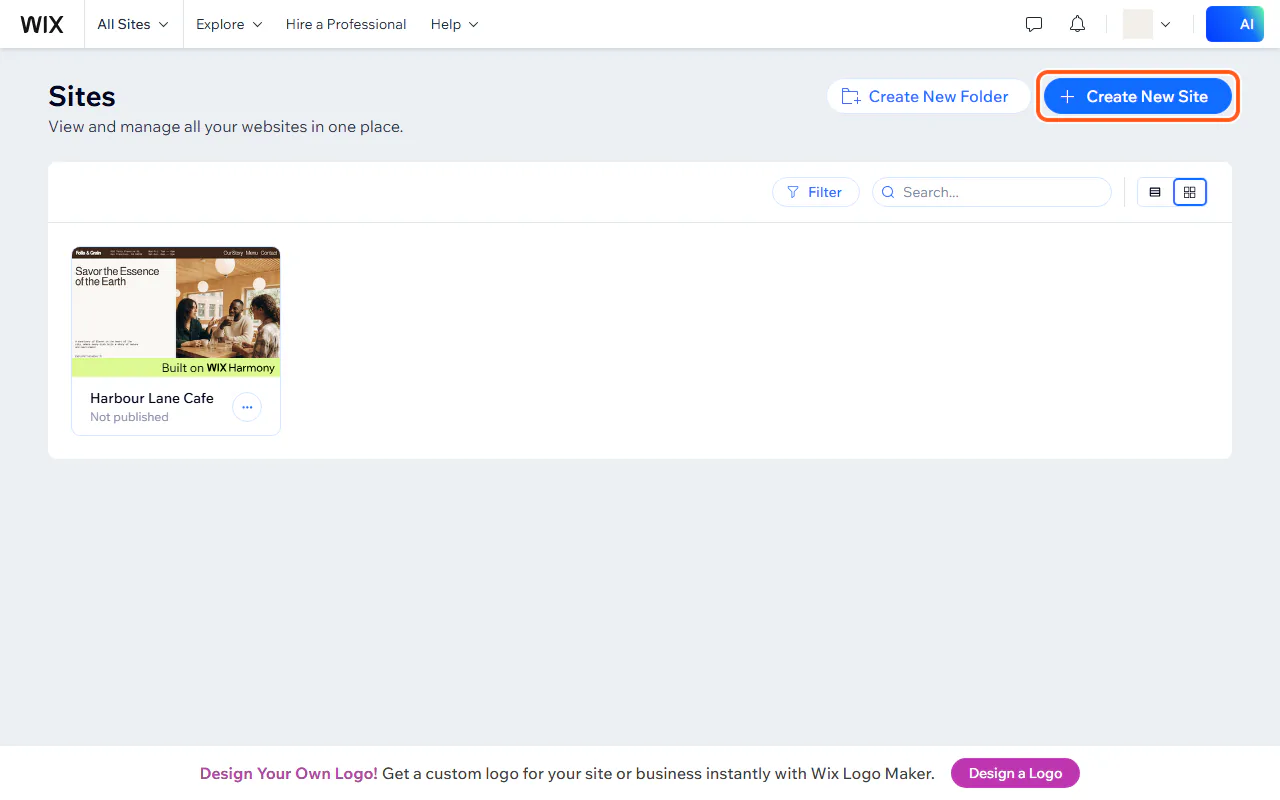
Log in to wix.com and go to My Sites (manage.wix.com). Click Create New Site at the top right.
If this is your first site, the button also appears in the middle of the page under "Create your first site".
-
Step 2: Choose the chat or the quick questions
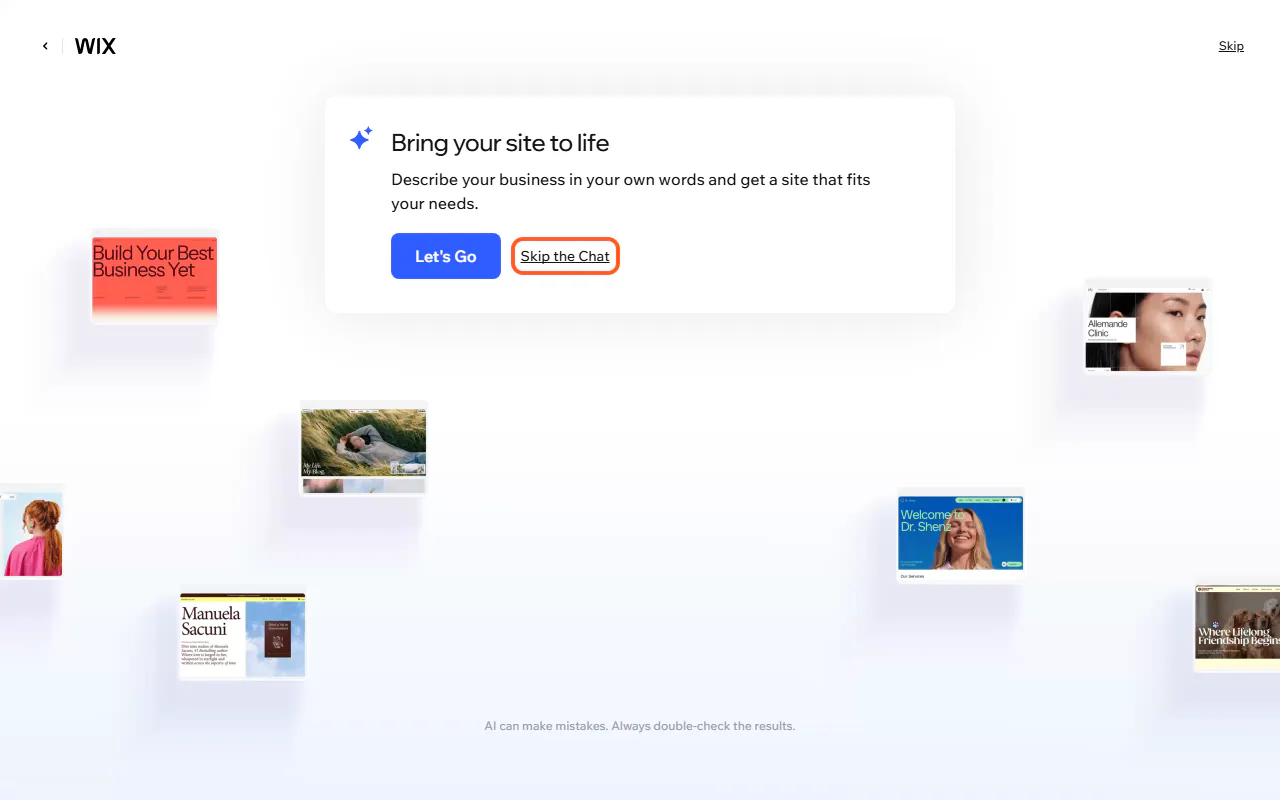
Wix first offers to build your site with its AI chat (Let's Go). The chat writes a whole site for you, but what it makes is different every time.
We clicked Skip the Chat to answer a few short questions instead and start from a template, which gives you more say in the result.
-
Step 3: Answer the setup questions
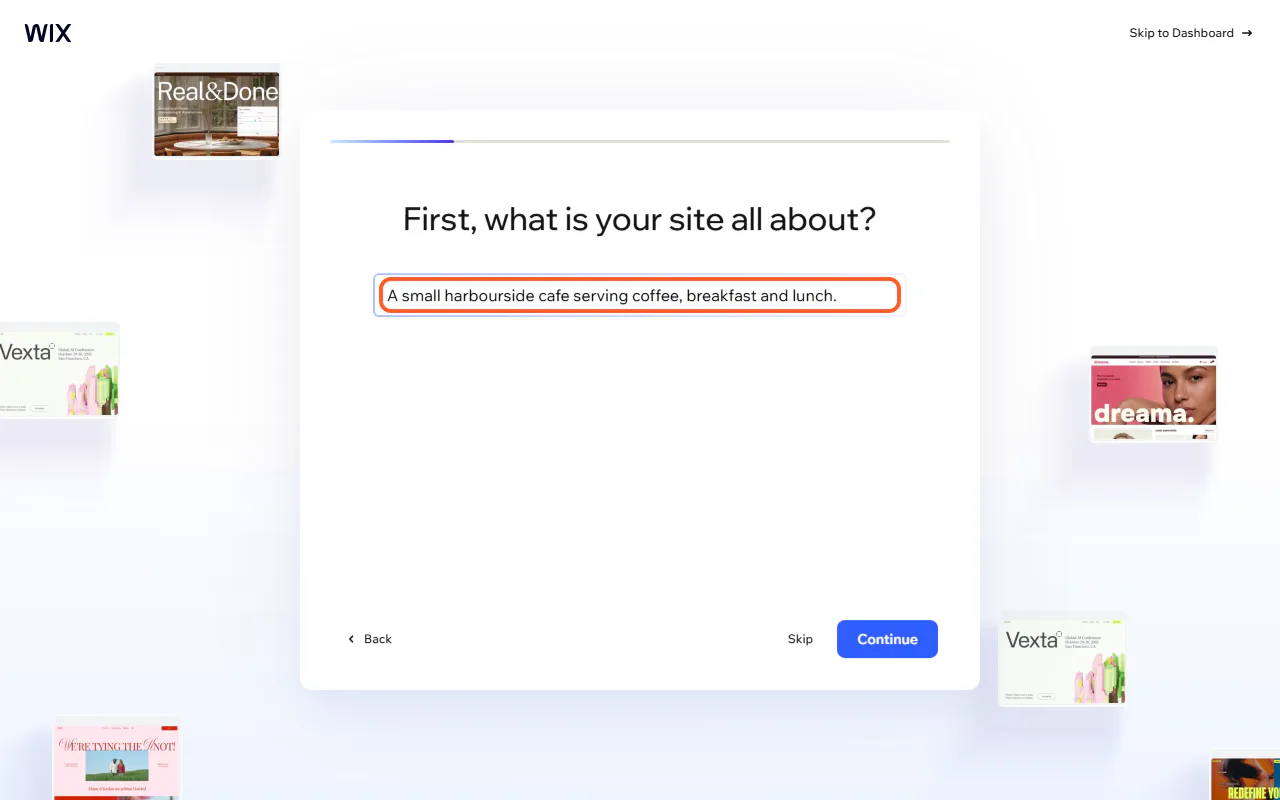
Describe your business in a sentence or two (ours: "A small harbourside cafe serving coffee, breakfast and lunch") and click Continue. Then type your site's name. Wix uses it as the site name in your dashboard.
The next screens ask for your goals, suggest apps (for us: menus, online orders and table reservations, all ticked) and offer a custom domain, including a .com.au. You can click Skip on each. We skipped the apps to keep the site simple, and skipped the domain to stay free. Wix then creates the site and opens its dashboard.
-
Step 4: Pick a template
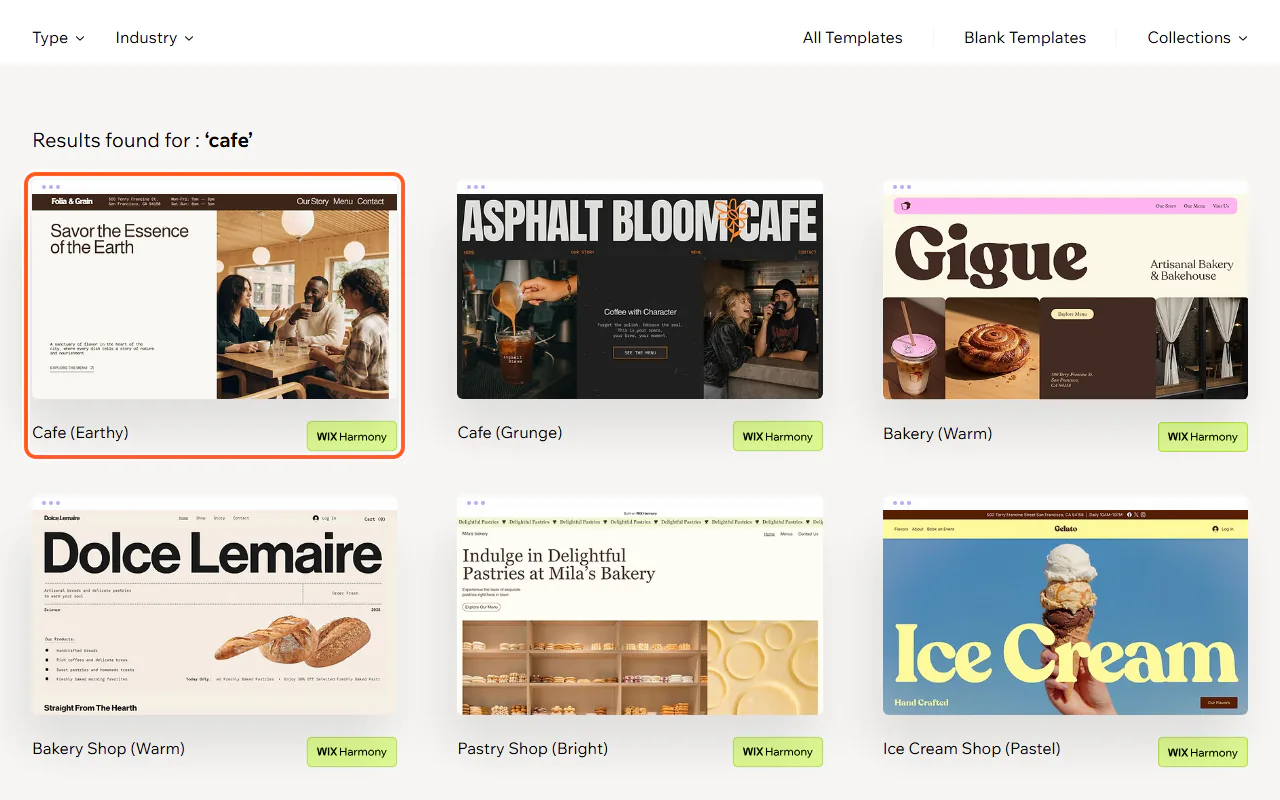
In the dashboard, click Design Site. Wix offers to generate a site from a prompt, and below that shows templates under "Or, start from a template recommended for you". Hover over one and click Edit to open it in the editor.
You can also browse every template at wix.com/website/templates; ours came up when we searched "cafe". We used Cafe (Earthy).
-
Step 5: Replace the text with your own
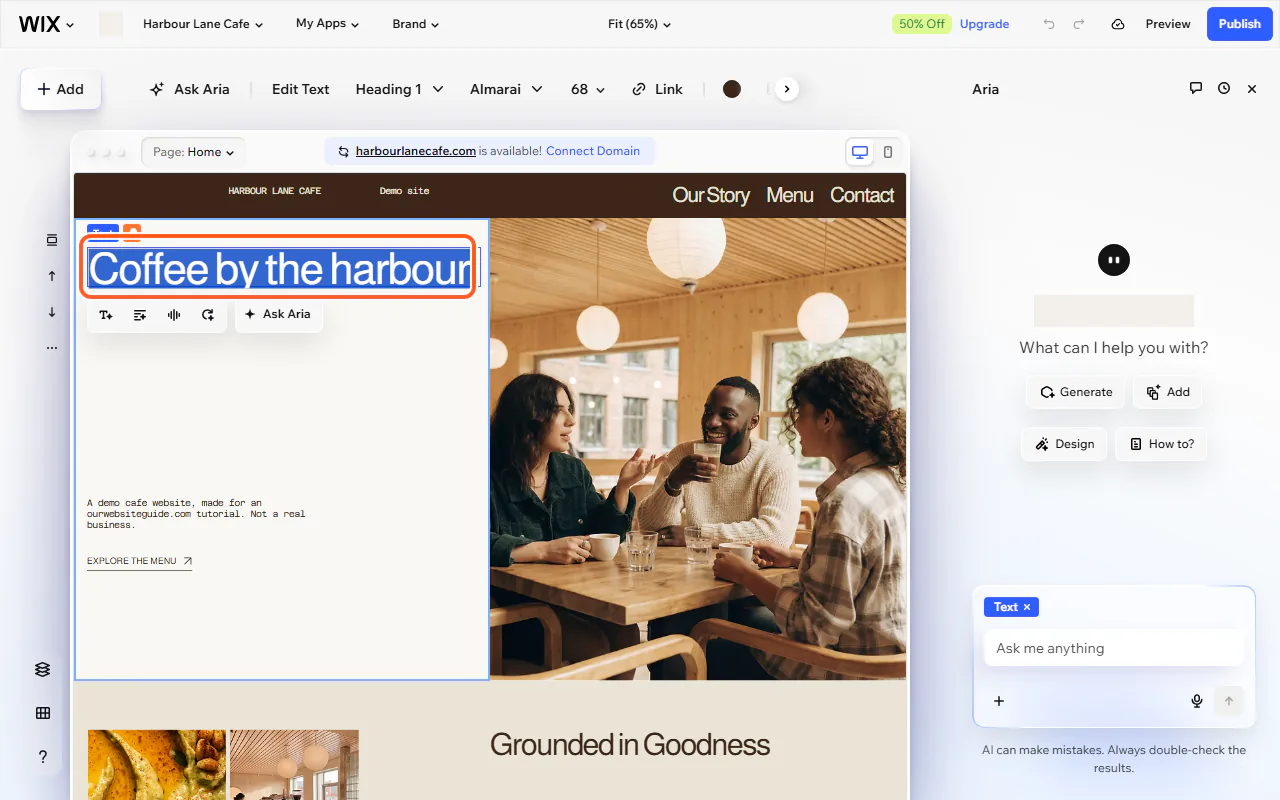
Double-click any text on the page to edit it, select the old words and type your own. A toolbar at the top lets you change the style, font and size. Wix saves your changes as you go.
Templates come with a made-up business: a name, logo, street address, phone number, opening hours, menu items and customer quotes. Replace or delete every one before you publish. To swap the logo, click it and choose Customize Logo, then Replace Logo.
-
Step 6: Remove the sections you don't need
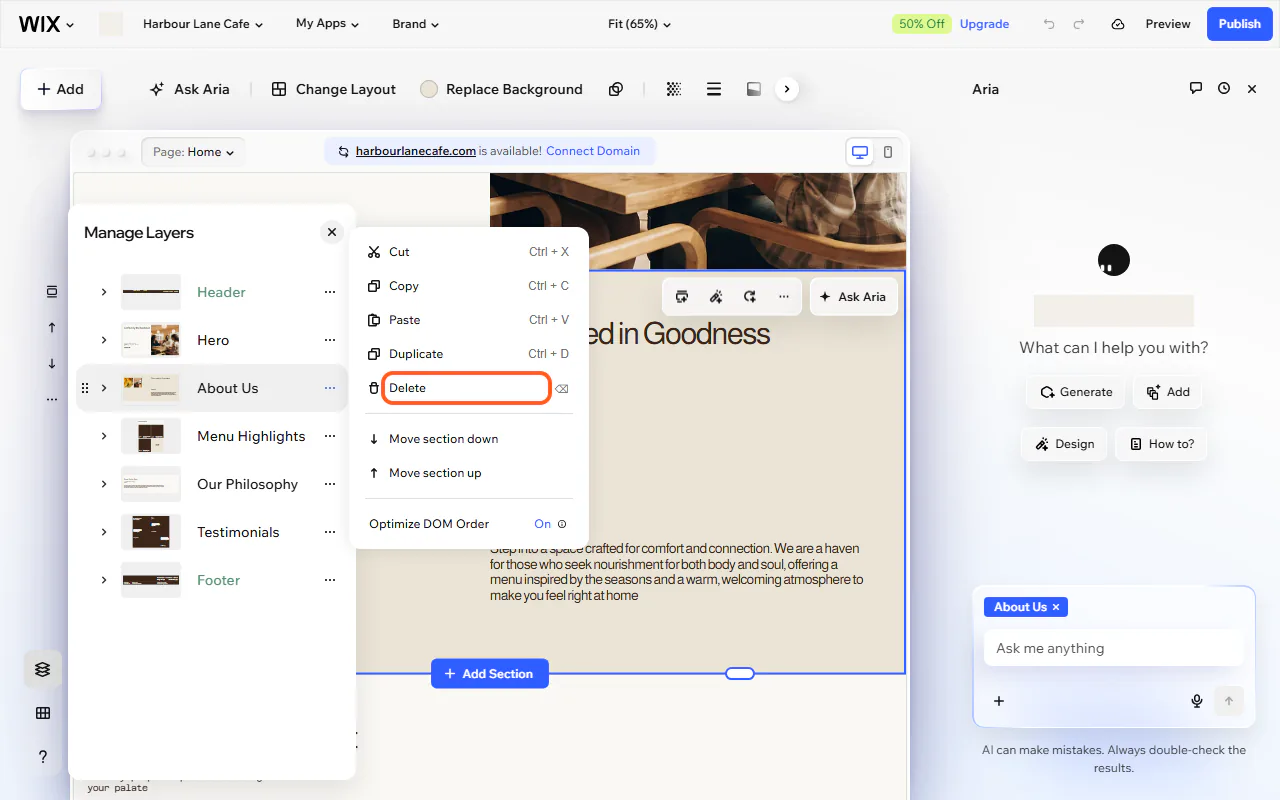
Each page is built from sections stacked one above the other. Click the Layers button (bottom left) to see them listed: ours had Header, Hero, About Us, Menu Highlights, Our Philosophy, Testimonials and Footer.
Click the three dots beside a section and choose Delete to remove it. Delete any section you can't fill with real content, especially sample testimonials: don't publish quotes from customers who don't exist.
-
Step 7: Set up your pages
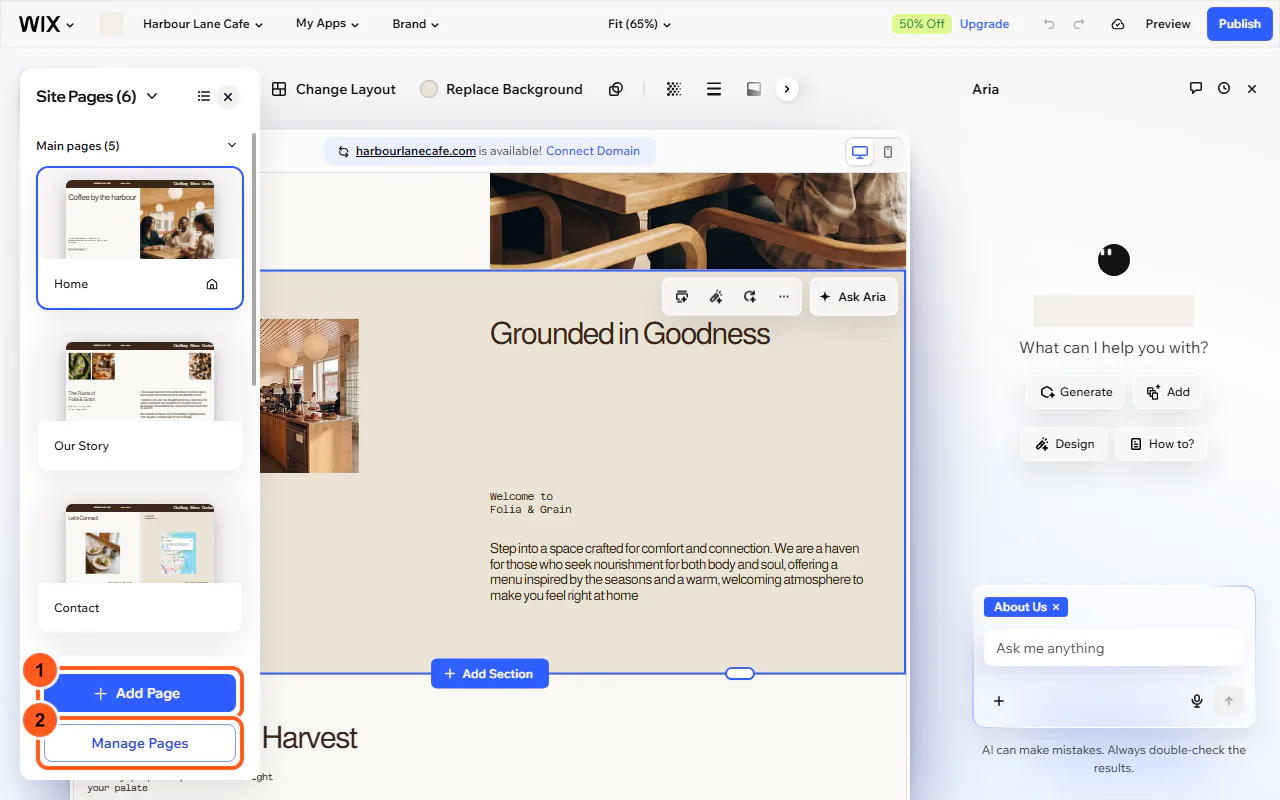
Click Page: Home above the canvas to see all your pages. Our template came with Home, Our Story, Contact and a Menu page, plus Accessibility Statement and Privacy Policy pages.
Use Add Page to add one, or Manage Pages to rename, reorder or delete them. The menu at the top of your site lists your main pages.
-
Step 8: Check the mobile view
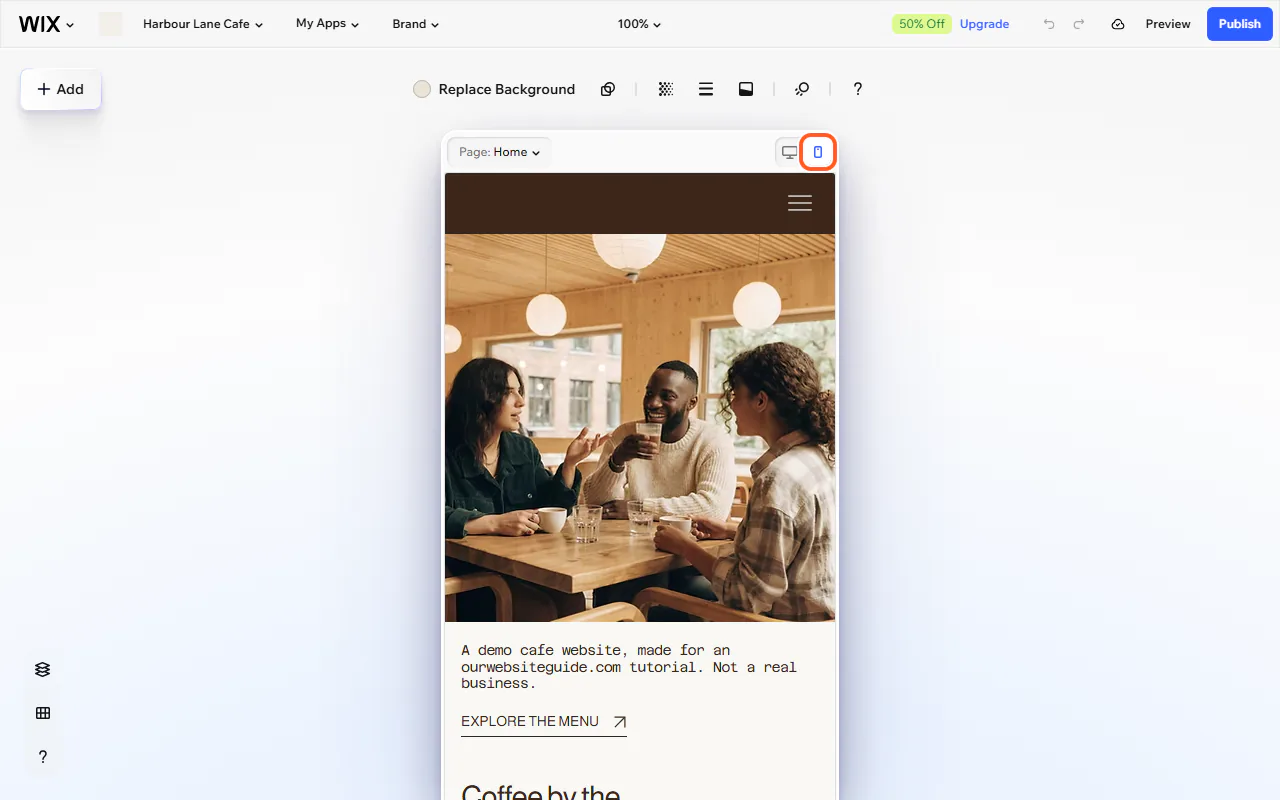
Most visitors will see your site on a phone. Click the phone icon at the top right of the canvas to switch to the mobile view. Wix rearranges the page for a narrow screen and moves the top menu into a menu button.
Scroll through every page in this view and fix anything that looks squashed or out of order. Click the computer icon beside it to go back to the desktop view.
-
Step 9: Get your site ready for Google
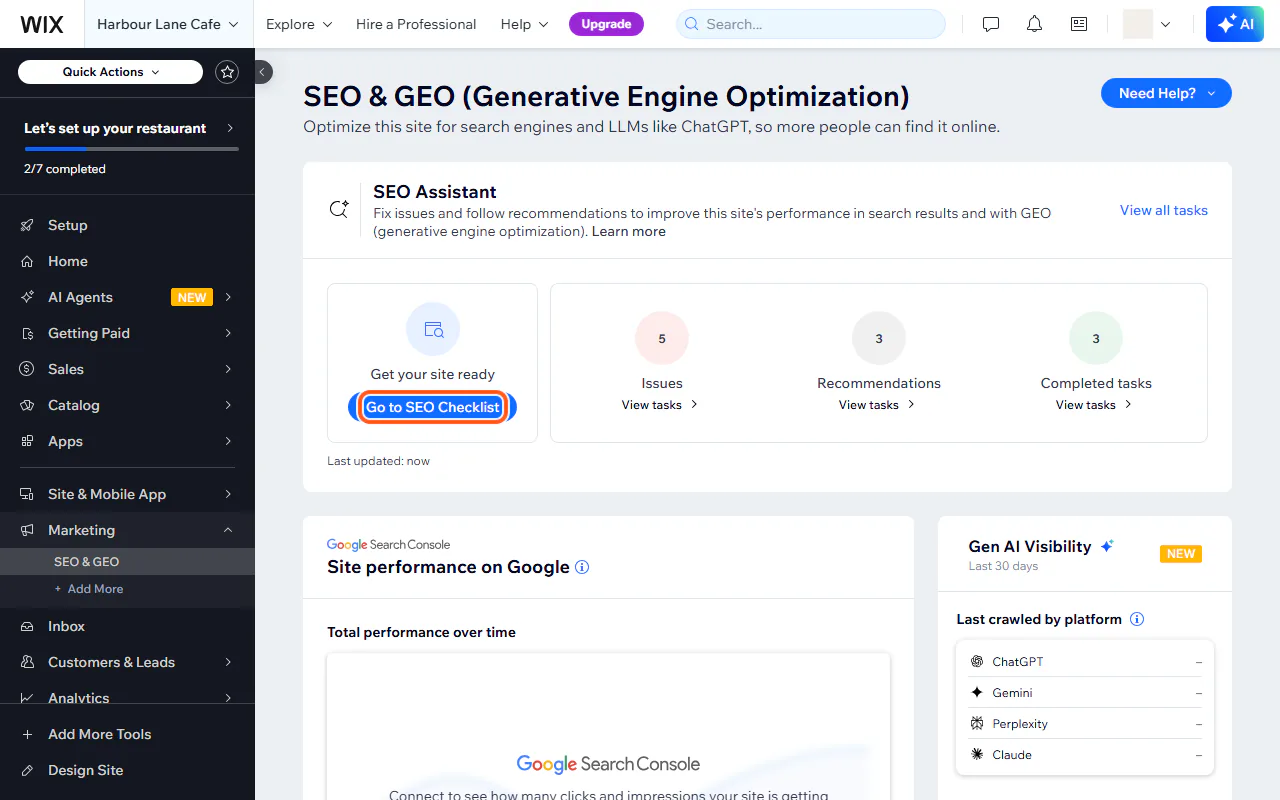
Back in the dashboard, open Marketing, then SEO & GEO. Wix lists issues and recommendations for your site. Click Go to SEO Checklist and work through its tasks before you publish.
The same page has a Connect to Google button for Google Search Console, which shows how often your site appears in Google once it's live.
-
Step 10: Check your free address
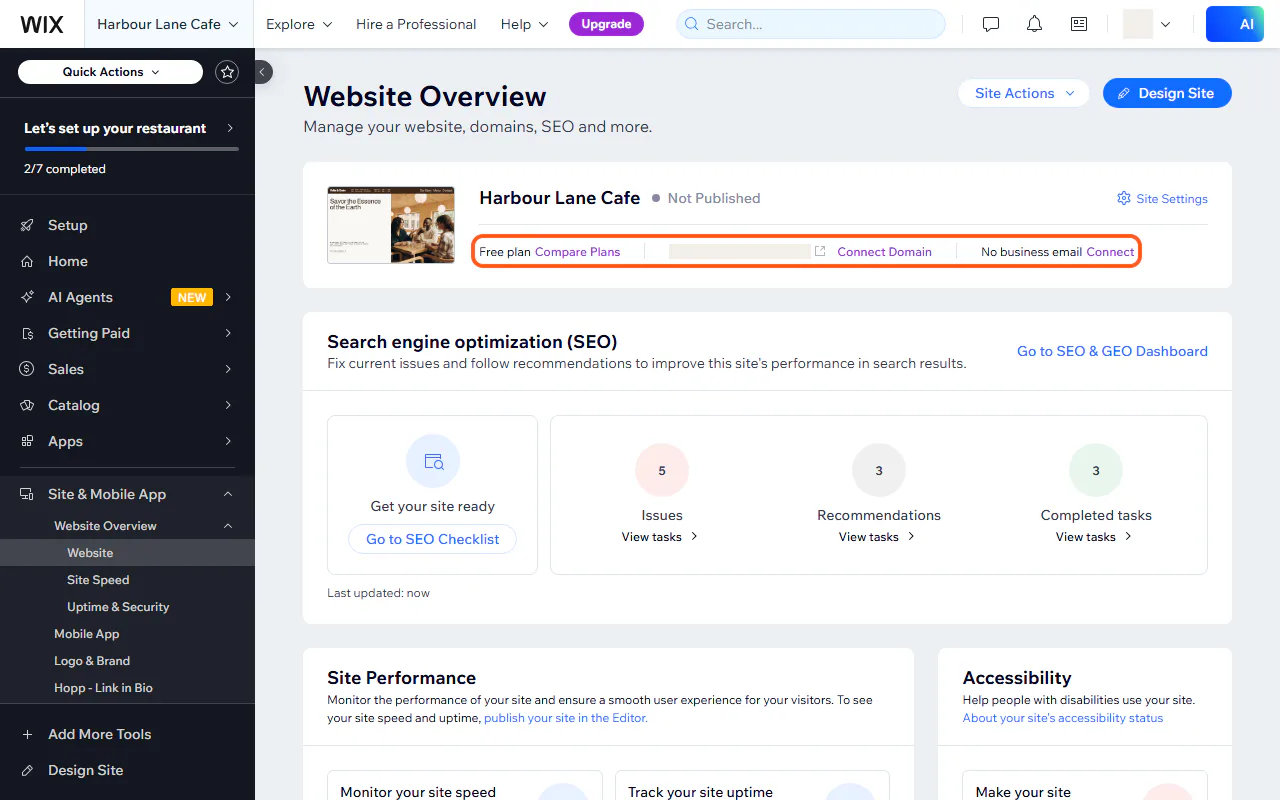
In the dashboard, open Site & Mobile App, then Website Overview. It shows your plan (Free plan), whether the site is published, and your free address, in the form yourusername.wixsite.com/your-site-name.
Connect Domain here is for using your own domain, such as a .com.au. That needs a Premium plan. On the Free plan your site also shows Wix branding.
-
Step 11: Preview, then publish
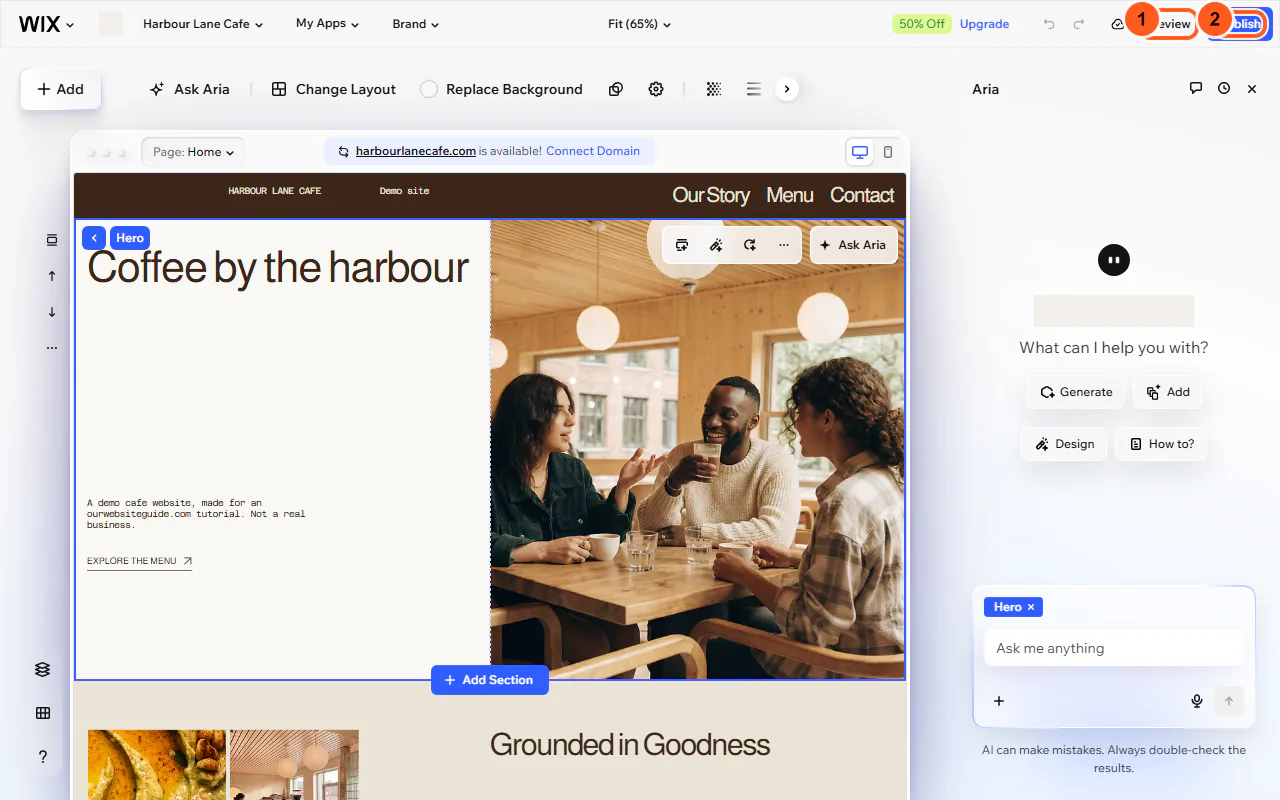
In the editor, click Preview (top right) to see your site as a visitor would. When you're happy, click Publish. Your site goes live at your free wixsite.com address.
We stopped before this click: our made-up demo cafe isn't a real business, so we didn't put it online.
Comparison
| Plan | Price | What you get |
|---|---|---|
| Free | A$0 | Free wixsite.com address, hosting, drag-and-drop editor, templates. Shows Wix branding. |
| Light | A$21 | Connect your own domain, free domain for 1 year, 2 GB storage, light marketing suite. |
| Core | A$42 | 50 GB storage, accept payments, basic eCommerce, scheduling and services. |
| Business | A$55 | 100 GB storage, standard eCommerce and marketing suite. |
| Business Elite | A$199 | Unlimited storage, advanced eCommerce and marketing, advanced developer platform. |
Troubleshooting
I don't want to pay for a domain yet
On the "Connect a custom domain" setup screen, click Skip. Your site keeps its free wixsite.com address, and Connect Domain in Website Overview lets you add one later.
The menu has pages I don't want
Click Page: Home above the canvas, then Manage Pages, and delete or hide the pages you don't need.
Something looks wrong on phones
Switch the editor to mobile view (the phone icon at the top right of the canvas) and fix it there.
Frequently asked questions
Is Wix really free?
Yes. The Wix Free plan cost A$0 when we checked on 17 October 2026. You get a free wixsite.com address and hosting, and your site shows Wix branding. Connecting your own domain and removing the branding need a Premium plan, from A$21 a month billed yearly (Light), including GST.
Can I use a .com.au domain with Wix?
Yes, with a Premium plan. During setup Wix suggested .com.au names alongside .com. To register a .com.au you need an ABN or another Australian connection.
Are Wix prices in Australian dollars?
Yes. wix.com/plans showed us AUD prices that include GST, for yearly subscriptions paid in full.
Should I use the AI chat or a template?
Either works. The AI chat writes a complete first draft from your description, which is quick but different every time. A template gives you a tested layout to fill in. Whichever you choose, check and replace every piece of sample text before you publish.